When you search “how to sew a hoodie,” you might be planning your first DIY project at home — or you might be a brand founder trying to understand what goes into producing 500 units that all fit the same way. Either way, the construction process is more involved than it first appears.
Sewing a hoodie means assembling multiple cut panels into one functional garment. Each stitch, seam finish, fabric choice, and attachment point affects durability, fit, cost, and how the hoodie performs through repeated wear and washing.
This guide breaks down hoodie construction from a practical production standpoint, but the principles apply whether you are making one sample at home or preparing for bulk production. You will learn the basic sewing sequence, the key materials, the common construction mistakes, and the quality details that separate a simple hoodie from a well-made one.
What Does It Mean to Sew a Hoodie?
A hoodie looks simple, but the hood, body, sleeves, ribbing, pocket, drawstring, and trims all affect each other. One small change can influence fit, comfort, durability, and production cost.

A hoodie is not just a T-shirt with a hood attached. The hood changes how the neckline is finished. The kangaroo pocket affects the front panel layout. The cuffs and waistband change how the garment holds its shape. If it is a zip-up hoodie, the front zipper also affects the cutting, sewing sequence, and final alignment.
In practice, sewing a hoodie involves joining the front and back body panels, sleeves, hood panels, cuffs, waistband, pocket, drawstring system, and sometimes a zipper or lining. Each piece must be cut, aligned, stitched, reinforced, and finished correctly.
For a DIY project, the goal is usually to complete one wearable garment. For a clothing brand, the goal is different: every unit must fit consistently, wash well, and match the approved sample. That is why hoodie construction is not only about knowing the steps. It is also about understanding where quality problems can happen.
What Materials and Tools Are Required?
A good hoodie starts with the right shell fabric, ribbing, trims, thread, and sewing setup. Without the right materials and tools, even a simple design can lose shape or fail at stress points.

The core materials for a hoodie usually include:
- Shell fabric: Fleece, French terry, or another knit fabric, often in the 260–380 GSM range.
- Ribbing: Used for cuffs and waistband. It should have good stretch and recovery.
- Drawstring: Cotton, polyester, or braided cord, depending on the desired look and price point.
- Eyelets or buttonholes: Used for drawstring exits. Metal eyelets are common, while stitched buttonholes can look cleaner on premium styles.
- Thread: Durable polyester or poly-core thread, matched to the garment color.
- Labels and trims: Neck label, size label, care label, hangtag, zipper, or custom packaging if needed.
For home sewing, you can make a hoodie with a regular sewing machine, but it helps to use a stretch needle, polyester thread, clips instead of pins for thick fleece, and a zigzag or stretch stitch for seams that need flexibility. A walking foot can also help control thicker hoodie fabrics.
In factory production, different machines are used for different parts of the garment:
| Machine | Primary Use | Why It Matters |
|---|---|---|
| Overlock / Serger | Joining seams and finishing raw edges | Helps prevent fraying and keeps interior seams clean |
| Flatlock Machine | Athletic seams, decorative flat seams | Creates smoother seams with less bulk |
| Single-Needle Lockstitch | Topstitching, pocket edges, labels | Gives clean visible stitching |
| Bartack Machine | Pocket corners, drawstring exits, stress points | Reinforces areas that receive pulling or tension |
| Buttonhole Machine | Fabric drawstring holes | Creates clean drawstring exits without metal hardware |
A home sewing machine can produce a sample, but it may not offer the same consistency, tension control, or stitch variety as industrial machines. In bulk production, the challenge is not only making one hoodie look good. It is making every hoodie match the approved standard.
How to Choose Hoodie Fabric: Beyond “Soft” and “Thick”
Fabric weight, fiber content, stretch, and shrinkage behavior directly affect how a hoodie drapes, fits, washes, and holds its shape. A mid-weight cotton-poly fleece or French terry is often the safest starting point for new brands.

Fabric selection is one of the most important decisions in hoodie development. It affects the sewing method, the finished weight, the cost per unit, and how the garment feels after washing.
The two most common hoodie fabrics are:
- Fleece: Usually has a brushed interior. It feels warmer and fuller, making it suitable for cold-weather hoodies, premium basics, and heavyweight streetwear.
- French Terry: Has a loop-back interior. It is lighter, more breathable, and often used for year-round casualwear, athleisure, and layering pieces.
GSM, or grams per square meter, is a practical way to compare hoodie fabric weight:
| GSM Range | Typical Use Case | Key Considerations |
|---|---|---|
| 220–260 GSM | Lightweight layering or summer hoodies | Comfortable but may feel less structured |
| 260–320 GSM | Mid-weight everyday hoodies | Balanced for drape, comfort, and production cost |
| 320–380 GSM | Heavyweight or structured hoodies | Better body and premium feel, but higher fabric cost |
| 400 GSM+ | Heavy streetwear or oversized styles | Strong structure, but may require stronger seams and careful shrinkage control |
If you are still comparing fleece, French terry, cotton-poly blends, and heavyweight fabrics, our guide to the best hoodie material can help you choose a safer fabric before sampling.
Fiber blend also matters. A 100% cotton hoodie can feel natural and premium, but it may shrink more if the fabric is not properly pre-shrunk. Cotton-poly blends, such as 80/20 or CVC fabrics, often offer better shrinkage control, durability, and color consistency.
For a first hoodie project or first brand sample, a proven 280–320 GSM cotton-poly fleece or French terry is often a practical choice. It is usually easier to source, easier to sew consistently, and less risky than developing a custom fabric from the beginning.
Pattern and Cutting: Where Small Errors Become Big Problems
Cutting errors are difficult to fix after sewing begins. Shrinkage, grain direction, panel symmetry, and seam allowance must be checked before bulk cutting, or the same problem may appear across the entire production run.

Before the first stitch is made, every hoodie panel must be drafted and cut accurately. A small cutting error can create a larger problem later. For example, a front panel cut a few millimeters off can affect the shoulder seam, sleeve setting, pocket placement, and final body measurement.
A hoodie pattern usually includes:
- Front body panel
- Back body panel
- Sleeve panels
- Hood panels
- Cuffs
- Waistband
- Kangaroo pocket
- Zipper placket, if it is a zip-up hoodie
- Lining pieces, if required
In factory production, patterns are often digitized in CAD software and arranged into a marker to improve fabric usage. For home sewing, printed paper patterns or hand-drafted patterns can work, but the same principles still apply: the grainline, notches, seam allowance, and matching points must be accurate.
Before cutting, check these details:
- Shrinkage: Wash and dry a fabric swatch before cutting. If the fabric shrinks, the pattern needs to account for it.
- Grain direction: Panels should be cut on-grain. Off-grain cutting can cause twisting after washing.
- Panel symmetry: Hood pieces, sleeves, and pocket edges should be mirrored correctly.
- Nap direction: For brushed fleece, all panels should face the same direction to avoid shade differences.
- Seam allowance: Keep seam allowance consistent across all pieces, especially at armholes, side seams, and the hood neckline.
For brands, this is where a clear tech pack becomes important. If the pattern, measurement points, and tolerance are not defined before cutting, it becomes difficult to judge whether the finished sample is correct.
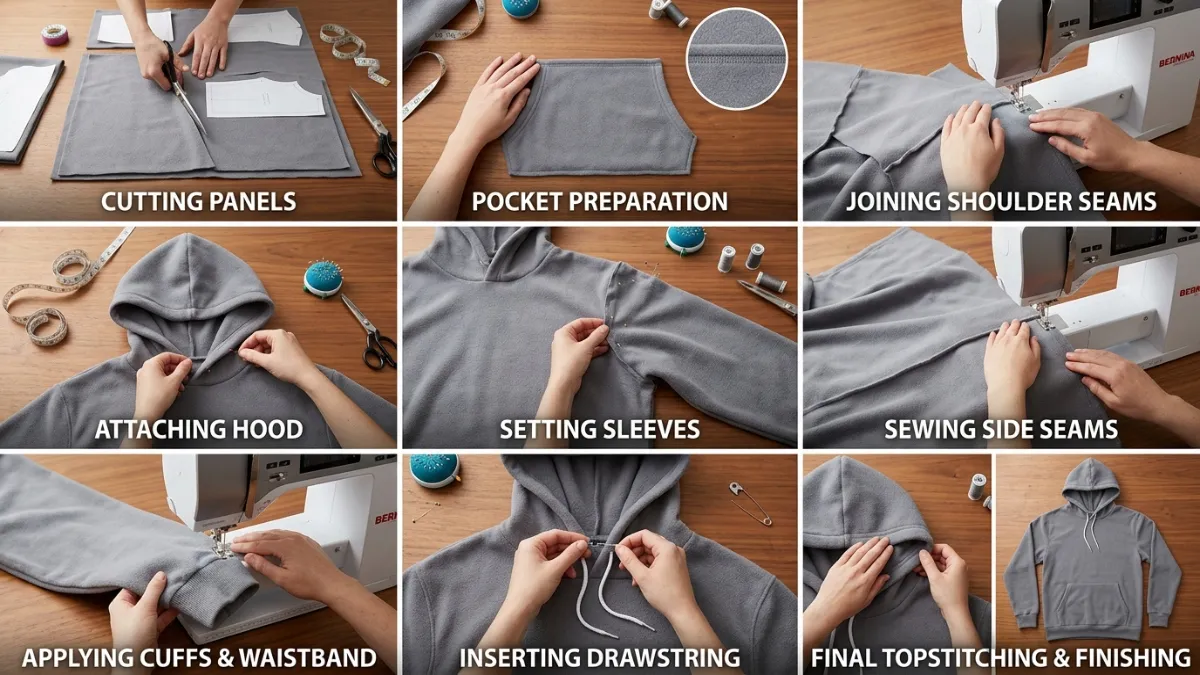
Step-by-Step Hoodie Sewing Process
A hoodie is usually sewn in a specific sequence: hood, pocket, front panel, shoulders, sleeves, side seams, hood attachment, cuffs, waistband, drawstring, and final finishing. Following the right order helps reduce rework and quality issues.

Whether you are sewing at home or managing factory production, the general construction sequence is similar. The difference is that factory production must repeat the same result across many units with consistent seam width, tension, alignment, and finishing.
For a first project, a pullover hoodie is usually easier than a zip-up hoodie because it avoids zipper alignment, front placket control, and extra topstitching.
1. Sew the Hood Panels
Start by sewing the hood panels together at the center seam. A two-panel hood is simpler, while a three-panel hood usually gives better shape and coverage.
After sewing, press the seam and topstitch if the design requires it. Check that the hood center seam is straight and the left and right sides are balanced.
2. Prepare the Kangaroo Pocket
Fold and press the pocket opening edges. Finish the raw edges if needed. Position the pocket on the front body panel using center marks and placement lines.
Topstitch the pocket onto the front panel. After the pocket is attached, reinforce the pocket corners with bartacks or short dense stitches. This is important because pocket corners receive frequent pulling during wear.
3. Join the Shoulder Seams
Place the front and back body panels together and sew the shoulder seams. Use an overlock, stretch stitch, or suitable knit stitch depending on your equipment.
Make sure the shoulder seams are even and do not stretch out during sewing. In production, shoulder seam stability can affect how the hood and neckline sit on the body.
4. Set the Sleeves
Attach the sleeves to the armholes. Set-in sleeves and raglan sleeves are different constructions, so the patterns are not interchangeable.
Match the notches, distribute any ease evenly, and sew with steady tension. A poorly set sleeve can create pulling, twisting, or puckering around the armhole.
5. Sew the Side Seams and Sleeve Seams
Sew from the sleeve opening down through the underarm and along the side seam in one continuous line. This helps keep the underarm point aligned.
Check that both side seams are the same length and that the underarm seam intersection is clean. Uneven side seams can cause the hoodie to hang poorly.
6. Attach the Hood to the Neckline
Match the hood center seam to the back neck point, then align the front edges and shoulder points. Pin or clip carefully before sewing.
The hood should lie flat around the neckline without pulling or gathering. If the neckline stretches too much during sewing, the hood may look wavy or sit poorly.
7. Apply the Cuffs
Fold the cuff ribbing in half and attach it to the sleeve opening. Stretch the rib evenly as you sew, but do not overstretch it.
Poor cuff tension can cause two common problems: rippling if the rib is too loose, or pulling if the rib is stretched too aggressively. Good rib recovery helps the cuff keep its shape after wear and washing.
8. Attach the Waistband
Attach the waistband in the same way as the cuffs. Divide both the waistband and body hem into equal points, then match them before sewing.
This helps distribute stretch evenly around the hem. If the waistband is unevenly stretched, the bottom of the hoodie may twist, ripple, or pull inward.
9. Add Eyelets, Buttonholes, and Drawstring
If the hoodie has a drawstring, finish the exit points before inserting the cord. Metal eyelets should be secure, and stitched buttonholes should be clean and reinforced.
After the drawstring is inserted, check that both ends are even and that the hood opening still sits correctly.
10. Finish, Press, and Inspect
Trim loose threads, check skipped stitches, inspect pocket corners, confirm rib tension, and steam press where needed.
For production, this stage also includes measurement checks, visual inspection, and sometimes wash testing. A hoodie can look acceptable before washing but show twisting, shrinkage, or seam distortion afterward.
Common Hoodie Sewing Mistakes and How They Affect Quality
The most damaging hoodie mistakes are often structural rather than cosmetic. Missing reinforcement, poor rib tension, off-grain cutting, and inconsistent seam allowance can affect fit, durability, and customer satisfaction.

Some hoodie problems are visible immediately. Others only appear after washing or repeated wear. These are the most common issues to watch for:
Misaligned Hood Center Seam
If the hood panels are not cut or sewn accurately, the center seam may sit off-center. This makes the hood look crooked and affects the overall appearance of the garment.
Uneven Rib Attachment
Cuffs and waistbands need controlled stretch during sewing. If the rib is stretched too much, the garment may pull inward. If it is not stretched enough, the edge may ripple.
Missing Pocket Reinforcement
The kangaroo pocket is used frequently, so the corners need reinforcement. Without bartacks or strong reinforcement stitches, the pocket may start to separate after repeated use.
Poor Drawstring Exit Placement
Eyelets or buttonholes should be symmetrical and reinforced. If the placement is uneven, the drawstring will not sit correctly. If the reinforcement is weak, the fabric may tear.
Inconsistent Seam Allowance
Small seam allowance differences can create size variation between units. In one sample, this may not be obvious. In bulk production, it can create noticeable differences between garments labeled as the same size.
Ignoring Shrinkage
A hoodie may measure correctly before washing but become too small afterward. This is especially common when using cotton-rich fabrics without pre-shrink testing.
For brands, these mistakes can lead to returns, poor reviews, and a weaker product reputation. For DIY makers, they can make the finished hoodie look less polished even if the basic construction is complete.
DIY Sewing vs. Factory Production
DIY sewing focuses on flexibility and learning, while factory production focuses on repeatability. The more detailed the specifications are, the easier it is to produce consistent hoodies at scale.

Making one hoodie at home and producing hundreds of hoodies in a factory are different challenges.
| Factor | DIY / Small Studio | Factory Production |
|---|---|---|
| Main Goal | Learning, customization, flexibility | Repeatability, speed, cost control |
| Sewing Equipment | Usually limited | Specialized machines for different operations |
| Seam Consistency | Depends on individual skill | Controlled through machines, guides, and QC |
| Sample Changes | Can be adjusted quickly | Requires updated pattern, tech pack, and sample approval |
| Cost Structure | High time cost per unit | Setup cost spread across volume |
| Quality Control | Visual check by maker | Measurement check, seam check, bulk inspection |
For a home sewer, small adjustments can be made during the sewing process. For a factory, every change needs to be communicated clearly before production begins.
This is why vague instructions can create problems. “Make the hood look clean” is not enough. A better instruction would specify hood panel type, seam allowance, topstitching, drawstring placement, and neckline finish.
Good factories work best when instructions are clear, measurable, and realistic. The factory’s job is to follow the approved sample and specifications. The brand’s job is to provide enough detail for the factory to understand the desired result.
What Should a Hoodie Tech Pack Include?
A hoodie tech pack is a production blueprint. It should explain the measurements, fabrics, trims, seam construction, tolerance, artwork placement, labels, packaging, and quality standards before sampling begins.

A tech pack connects the design idea to the actual production process. Without it, too many decisions are left to interpretation.
A complete hoodie tech pack should include:
- Technical flat sketch
- Size spec sheet with measurement points
- Graded measurements for each size
- Fabric details, including GSM, composition, and shrinkage behavior
- Rib specifications for cuffs and waistband
- Drawstring, eyelet, zipper, and trim details
- Seam and stitch construction details
- Pocket placement and reinforcement requirements
- Print or embroidery artwork placement
- Label and packaging instructions
- Colorway details, such as Pantone references
- Measurement tolerance
- Quality control checklist
Many startup brands provide a design reference but leave out seam details. This can lead to differences between the sample and expectation.
For example:
- “Pocket reinforced” should specify whether that means bartack, zigzag, or another reinforcement method.
- “Rib attached” should include flat measurement or stretch expectations.
- “Heavyweight hoodie” should define the actual GSM range.
- “Oversized fit” should include chest, shoulder, sleeve, and body length measurements.
Tolerance is also important. A relaxed hoodie may allow a slightly wider measurement tolerance than a fitted athletic hoodie. If tolerance is not defined, it becomes harder to judge whether a sample or bulk unit is acceptable.
Wash instructions should also be decided before sampling. If the hoodie is meant for machine washing and tumble drying, the fabric and seams need to be tested for that use case.
When Should You Work with a Hoodie Manufacturer?
You should work with a hoodie manufacturer when you have a defined design direction, target fabric, size range, and enough order volume to justify sampling and production setup.

There is no fixed moment when every brand becomes “ready” for manufacturing, but there are clear signs:
- You have a design reference, sketch, or sample inspiration.
- You know the target fabric type, GSM, and hand feel.
- You understand your target retail price or cost range.
- You have a rough size range.
- You are prepared for MOQ requirements.
Many hoodie manufacturers start around 100–300 pieces per color or style, depending on fabric, construction, customization, and factory setup. Highly customized fabrics, special dyeing, complex embroidery, or custom trims may require higher quantities.
A reliable manufacturer will usually ask questions before quoting:
- What fabric do you want?
- What GSM range are you targeting?
- Do you need printing, embroidery, labels, or packaging?
- What is your expected quantity per color?
- Do you already have a tech pack?
- What is your sample and bulk timeline?
It is worth being cautious with factories that quote a final price without seeing any design details. Early prices are often estimates, and the final price may change once the fabric, construction, and customization are confirmed.
| Brand Stage | Recommended Next Step |
|---|---|
| Concept only | Collect references, define target price and fabric direction |
| Fabric and fit defined | Prepare tech pack and request sample quote |
| Tech pack ready | Submit to 2–3 factories and request samples |
| Sample approved | Confirm bulk lead time, QC process, packaging, and payment terms |
If you are moving from one sample to bulk production, working with an experienced hoodie manufacturer can help you control fabric sourcing, sampling, sewing quality, sizing, and production timelines.For simple hoodie samples, lead time may be around 8–12 days. More complex samples with custom fabric, embroidery, wash effects, or special trims may take longer. Bulk production after sample approval often takes around 25–35 days, depending on fabric availability, order size, and production schedule.
Final Thoughts
Understanding how to sew a hoodie is not only about learning a sewing sequence. It is about understanding how fabric, pattern, seams, ribbing, trims, and finishing all work together.
For a DIY project, this knowledge helps you make a cleaner, more durable garment. For a clothing brand, it helps you prepare better specifications, communicate with manufacturers more clearly, and avoid costly sample or bulk production mistakes.
A well-constructed hoodie does not happen by accident. It starts with the right fabric, a stable pattern, accurate cutting, reinforced stress points, controlled rib attachment, and clear quality standards.
If you are developing a hoodie line and need help with fabric sourcing, sample development, tech pack review, or bulk production planning, working with an experienced hoodie manufacturer can help you avoid many early-stage mistakes.
A hoodie that fits well, washes well, and holds its shape earns more trust from customers. And that starts long before the first stitch is made.